Looking to transform your hallway into a stylish and organized space? You’re in the right place.
A hallway storage table can be the perfect solution to keep your essentials handy while adding charm to your home. Imagine having a spot for your keys, mail, and decorative items—all neatly arranged without clutter. You’ll discover simple DIY projects that make building your own hallway storage table easy and fun.
Ready to create something that fits your style and needs perfectly? Let’s dive in!
Choosing The Right Table Design
Choosing the right hallway storage table makes a big difference. It helps you keep your space tidy and stylish.
Think about your hallway size and how much stuff you want to store. This helps pick the best design.
Compact Vs. Spacious Tables
Compact tables fit well in small hallways. They save space but still hold keys and mail.
Spacious tables offer more storage. They work well in bigger hallways and can hold baskets or decor.
- Compact tables are slim and simple
- Spacious tables have drawers or shelves
- Choose based on your hallway size and needs
Materials And Finishes
Wood is a common choice for hallway tables. It is strong and looks warm and natural.
Metal tables add a modern or industrial look. They are easy to clean and last long.
- Wood: classic, warm, durable
- Metal: modern, sleek, low maintenance
- Glass: stylish but needs careful cleaning
- Finishes like paint or stain change the table’s look
Matching Your Hallway Style
Match the table style to your hallway design. This creates a balanced and welcoming space.
For rustic hallways, choose rough wood and simple shapes. For modern halls, pick clean lines and smooth finishes.
- Rustic: raw wood, natural colors
- Modern: metal, glass, bold shapes
- Traditional: carved wood, rich stains
- Minimal: simple designs, neutral colors
Essential Tools And Supplies
Building a hallway storage table needs the right tools and materials. Having these helps you work safely and finish well.
This guide covers basic woodworking tools, paints and stains, and hardware accessories you will need.
Basic Woodworking Tools
You need simple tools to cut, shape, and join wood parts for your table. Good quality tools make your work easier.
- Measuring tape to get exact sizes
- Handsaw or circular saw for cutting wood
- Hammer to drive nails
- Chisels for fine wood shaping
- Power drill for making holes and screwing
- Screwdrivers for tightening screws
- Sandpaper or electric sander to smooth surfaces
- Clamps to hold wood parts steady
Paints And Stains
Paints and stains protect the wood and add color. Choose the right finish for your hallway style.
| Type | Purpose | Dry Time |
|---|---|---|
| Wood stain | Enhances natural grain | 4-6 hours |
| Latex paint | Provides solid color | 1-2 hours |
| Polyurethane | Protects surface with clear coat | 6-8 hours |
Hardware And Accessories
Hardware holds the table together and adds function. Choose sturdy pieces that fit your design.
- Screws and nails in various sizes
- Drawer slides if your table has drawers
- Cabinet handles or knobs
- Corner brackets for extra support
- Wood glue for strong joints
- Felt pads to protect floors
Simple Build Plans For Beginners
Building a hallway storage table is a great project for beginners. These tables help keep your hallway tidy and add style. You do not need advanced skills or tools to make one.
Below are three easy plans. Each plan uses simple materials and steps. Choose the style you like and start building today.
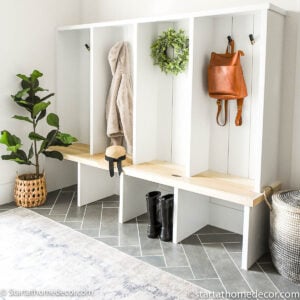
Minimalist Floating Table
This table looks light and modern. It attaches to the wall and has no legs. It is perfect for small hallways.
- Use a strong wooden board for the top
- Attach metal brackets to fix the board on the wall
- Sand and paint the board in a color you like
- Mount the table at a comfortable height
- Add a small shelf below for extra storage
Rustic Wooden Console
This console has a warm, natural look. Use rough wood and simple joints. It can hold keys, mail, or decorations.
| Material | Quantity | Notes |
| Wooden planks | 3 | For top and legs |
| Wood screws | 12 | To join pieces |
| Wood stain or paint | 1 can | Protects and colors wood |
| Sandpaper | 1 sheet | For smoothing surfaces |
Cut the planks to size, then join them with screws. Sand all surfaces well. Finish with stain or paint. Let dry before use.
Repurposed Crate Table
Use old wooden crates to create a unique hallway table. This project is eco-friendly and easy to do.
Basic steps to build:
- Find 2 or 3 sturdy wooden crates.
- Stack crates horizontally or vertically.
- Secure crates together using screws or brackets.
- Sand rough edges for safety.
- Paint or leave natural depending on your style.
Credit: startathomedecor.com
Adding Storage Features
Adding storage features to a hallway table helps keep the space tidy. It also makes the table more useful for daily needs.
There are many ways to add storage. You can use drawers, shelves, baskets, hooks, or racks depending on your needs.
Incorporating Drawers
Drawers provide hidden storage for small items. They keep things like keys, mail, and tools out of sight.
You can add one or more drawers under the table top. Choose drawer sizes based on what you plan to store.
- Small drawers for keys and wallets
- Medium drawers for mail and papers
- Deep drawers for gloves and hats
Shelves And Baskets
Shelves under the table provide open storage space. They are great for baskets that hold shoes or scarves.
Baskets help organize items and keep them easy to grab. You can use different sizes to fit your needs.
- Wooden shelves for sturdy support
- Wicker baskets for a natural look
- Metal baskets for modern style
Hooks And Racks
Hooks and racks add vertical storage on or near the table. They hold coats, bags, or keys within easy reach.
Install hooks on the side or back of the table. You can also add a small rack on top for sunglasses or mail.
- Metal hooks for durability
- Wooden pegs for a rustic look
- Small racks for organizing mail or accessories
Creative Finishing Touches
Adding creative finishing touches can make your DIY hallway storage table unique. These details help the table fit your home’s style.
Simple changes like paint, hardware, and personal accents give your project a special look. These ideas make a big difference.
Painting And Distressing
Painting your table adds color and personality. Use colors that match your hallway or add contrast.
Distressing paint gives a vintage, worn look. You can sand edges or use special paint techniques.
- Choose matte or satin paint for soft finishes
- Use chalk paint for easy distressing
- Sand corners gently for a natural worn look
- Apply a clear wax or sealant after distressing
Decorative Hardware
Hardware changes the style and function of your table. Pick knobs, handles, or hooks to add charm and use.
Decorative hardware can match metal accents in your home or create a bold contrast.
- Use vintage knobs for a classic look
- Choose sleek handles for modern style
- Add hooks for keys or bags
- Mix different finishes like brass or black
Personalized Accents
Personal touches make your table feel special. Add items like framed photos or small plants.
Use letters, signs, or small decor pieces to match your personality and style.
- Place small potted plants or succulents
- Add a tray for organizing mail or keys
- Use picture frames with family photos
- Include decorative bowls or candles

Credit: 100things2do.ca
Maintenance Tips For Longevity
A hallway storage table is a practical addition to any home. With proper care, it can last for years. Here are some maintenance tips to keep it looking new.
Regular upkeep is important for maintaining the beauty and functionality of your table. Follow these simple tips to ensure its longevity.
Cleaning And Care
Dust your table weekly with a soft cloth. This prevents dirt buildup. Use a mild cleaner for deeper cleaning. Avoid harsh chemicals that can damage the finish.
Place coasters under drinks to prevent water marks. Use placemats to protect the surface from scratches.
- Dust weekly with a soft cloth
- Use mild cleaners for deeper cleaning
- Place coasters under drinks
- Use placemats to prevent scratches
Repairing Scratches And Dents
Small scratches can often be buffed out with a cloth. For deeper scratches, use a wood filler. Sand lightly and apply a matching finish.
Dents can be fixed with a damp cloth and an iron. Place the cloth over the dent, then iron over it to lift the wood fibers.
- Buff out small scratches with a cloth
- Use wood filler for deeper scratches
- Fix dents with a damp cloth and iron
Seasonal Upkeep
Check your table seasonally for any signs of wear. In dry months, consider using a humidifier to maintain wood moisture. In humid months, ensure proper ventilation to prevent swelling.
Adjust the table’s placement if it’s in direct sunlight. This prevents fading. A seasonal wax can also protect the finish.
- Check for wear seasonally
- Use a humidifier in dry months
- Ensure ventilation in humid months
- Avoid direct sunlight
- Apply a seasonal wax for protection

Credit: www.henrikjunehome.com
Frequently Asked Questions
What Materials Are Best For Diy Hallway Storage Tables?
Wood like pine, oak, or plywood works best for durability and ease. Metal and reclaimed wood add unique style. Choose based on your budget, tools, and desired look.
How Can I Maximize Storage In A Narrow Hallway Table?
Use shelves, drawers, and hooks under or above the table. Opt for slim designs with vertical storage to save floor space and keep clutter organized.
What Tools Do I Need For Diy Hallway Storage Tables?
Basic tools include a saw, drill, screwdriver, measuring tape, and sandpaper. A level and clamps help ensure accuracy and stability during assembly.
How Do I Finish A Hallway Storage Table For Durability?
Apply primer, paint, or wood stain for protection. Use sealants like polyurethane to resist scratches and moisture, extending the table’s lifespan.
Conclusion
DIY hallway storage tables add style and function to any space. These projects help organize clutter and save room. You can choose designs that fit your style and needs. Building your own table gives a sense of pride and creativity.
Small changes make big differences in your home’s look. Try a project today and enjoy a neater hallway. Simple steps bring great results and lasting use. Keep your space tidy with easy, affordable DIY ideas.