Looking to add a personal touch to your nursery without spending a fortune? DIY nursery wall shelves are the perfect way to do just that.
Imagine having stylish, functional shelves that hold your baby’s favorite toys, books, and keepsakes—all crafted by you. Not only will these shelves save you money, but they’ll also create a warm, unique space that feels truly special. Ready to transform your nursery with simple, step-by-step ideas?
Keep reading to discover how easy and rewarding it can be to build your own nursery wall shelves.

Credit: www.create-enjoy.com
Choosing The Right Shelves
Picking the right nursery wall shelves is important for safety and style. Shelves hold toys, books, and decorations.
Think about what materials, size, and safety features you need. This helps you find shelves that last and look good.
Materials And Durability
Wood and plastic are common shelf materials. Wood looks warm and lasts long. Plastic is light and easy to clean.
Check if the shelves are sturdy enough for heavy toys or books. Durable shelves keep the nursery safe and tidy.
- Solid wood is strong and lasts many years
- MDF is cheaper but less durable
- Plastic shelves are easy to wipe clean
- Metal shelves add a modern look but may be heavy
Safety Considerations
Safety is key in a nursery. Choose shelves with smooth edges to prevent cuts. Avoid glass shelves to reduce breakage risks.
Make sure shelves are firmly attached to the wall. Use anchors or brackets to hold shelves in place and stop falling.
- Use rounded edges or sand sharp corners
- Install shelves at a height out of baby’s reach
- Secure shelves with wall anchors or brackets
- Avoid heavy items on upper shelves
Size And Placement
Choose shelf size based on the room space and what you want to store. Small shelves fit tight spaces well.
Place shelves where they are easy to reach but not in the way. Keep heavier items on lower shelves for safety.
- Measure wall space before buying shelves
- Use lower shelves for toys and books
- Place shelves away from cribs and play areas
- Keep shelves balanced to avoid tipping
Creative Shelf Designs
Nursery wall shelves add charm and function to a baby’s room. Creative designs make storage fun and stylish. They help keep toys, books, and decor organized.
Choosing the right shelf design can brighten the nursery and fit your space well. Here are some ideas for unique and practical shelves.
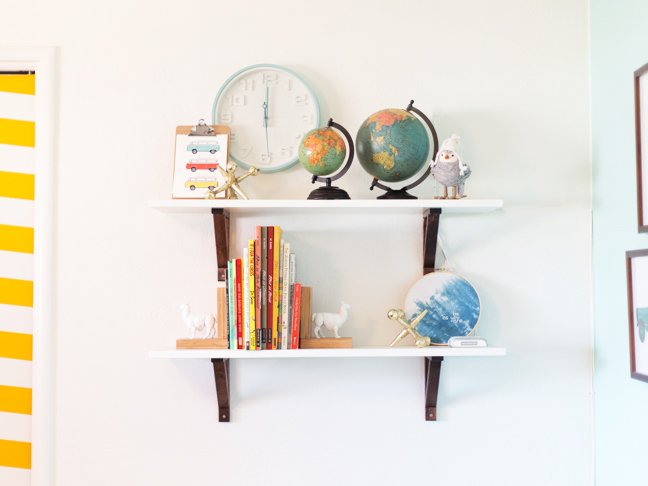
Floating Shelves
Floating shelves seem to hang on the wall without visible support. This design looks clean and modern. It is perfect for small nurseries because it saves floor space.
- Use soft pastel colors to match nursery themes.
- Place shelves at baby’s eye level for easy access.
- Add small baskets to keep toys tidy.
- Combine different lengths for a playful look.
Themed Shelving Units
Themed shelves add personality and fun to a nursery. Choose shapes that match a room’s style or your child’s interests. Themes can include animals, clouds, or storybook characters.
| Theme | Materials | Best Use |
|---|---|---|
| Animal Shapes | Wood, Paint | Display toys and books |
| Cloud Shelves | Wood, Soft Finish | Add soft décor and night lights |
| Storybook Units | Wood, Printed Panels | Store books and small toys |
Geometric Shapes
Geometric shelves use shapes like triangles, hexagons, or circles. They create eye-catching walls and offer many storage options. These shelves fit well with modern nursery themes.
- Mix shapes for a unique wall pattern.
- Paint shelves in bright or neutral colors.
- Use different sizes for storing toys and books.
- Group shelves for a balanced look.
Decorative Finishes
Decorative finishes make DIY nursery wall shelves more charming. They add style and match the nursery theme.
You can use paint, decals, or textures to decorate your shelves. Each option gives a unique look.
Painting And Staining
Painting brightens shelves with color. Staining shows the natural wood grain. Both protect the wood.
Choose paint or stain that is safe for children. Use soft colors to keep the nursery calm and cozy.
- Use non-toxic, water-based paints
- Try pastel or neutral colors
- Apply a clear sealant for durability
- Sand shelves before painting or staining
Adding Decals And Patterns
Decals add fun shapes or pictures to shelves. Patterns create interest and style. Both are easy to apply.
You can use stickers, stencils, or washi tape. Choose designs that match the nursery theme and colors.
- Use wall decals or removable stickers
- Try polka dots, stripes, or animal shapes
- Apply patterns with stencils and paint
- Use washi tape for quick decoration
Incorporating Textures
Textures make shelves feel warm and cozy. You can add fabric, rope, or wood accents to shelves.
Textured finishes add depth and interest. They also fit well in natural or rustic nursery themes.
- Wrap shelves with soft fabric or burlap
- Add rope trim around edges
- Use wood carvings or raised designs
- Glue felt shapes for a soft touch

Credit: www.amazon.ca
Functional Storage Ideas
DIY nursery wall shelves can help keep the room tidy and organized. They provide easy access to your child’s items.
Smart storage ideas make the nursery look neat while saving space. Shelves are a great way to store toys, books, and more.
Toy And Book Display
Wall shelves show off your child’s favorite toys and books. It helps keep these items within easy reach for kids.
Open shelves make it simple to find and grab toys or books. You can arrange them by size or color for a neat look.
- Use low shelves so kids can reach their toys
- Place books facing forward for easy selection
- Add small baskets to hold tiny toys
Basket And Bin Organization
Baskets and bins on shelves keep small items organized and off the floor. They hide clutter while still being easy to access.
Labeling baskets helps find items quickly. You can sort by type, like blocks, stuffed animals, or art supplies.
- Choose baskets that fit the shelf size
- Use lightweight bins for easy handling
- Keep daily items in front for convenience
Multi-purpose Shelves
Multi-purpose shelves serve many functions in a nursery. They can hold toys, books, clothes, and decor all in one place.
Combine open shelves with hooks or small drawers. This mix helps keep different items organized and easy to find.
- Use hooks below shelves for hanging hats or bags
- Add small drawers for socks or accessories
- Mix open and closed storage for a balanced look
Installation Tips
Installing nursery wall shelves can add charm and storage to your baby’s room. Proper installation keeps shelves safe and sturdy. Follow these tips to install shelves securely and evenly.
Use the right tools and materials. Choose the correct supports and anchors for your wall type. Check shelves are level and spaced well for a neat look.
Tools And Materials Needed
Gather all tools and materials before starting. Having everything ready saves time and avoids mistakes.
- Drill with drill bits
- Screwdriver (manual or electric)
- Wall anchors suitable for your wall type
- Measuring tape
- Level tool
- Pencil for marking
- Screws that fit your anchors and shelves
- Stud finder (optional but helpful)
Wall Anchors And Supports
Choose anchors based on your wall material. Drywall, plaster, or brick each need different anchors. Use strong supports to hold the weight of the shelf and items placed on it.
| Wall Type | Recommended Anchor | Support Type |
| Drywall | Toggle bolts or plastic anchors | Metal brackets or floating shelf supports |
| Plaster | Molly bolts | Metal brackets |
| Brick or Concrete | Masonry anchors or sleeve anchors | Heavy-duty metal brackets |
Leveling And Spacing
Measure carefully to place shelves evenly. Use a level to avoid a tilted look. Keep space between shelves for easy access and a tidy appearance.
- Mark the shelf position with a pencil on the wall.
- Use the level to check the marks are even.
- Measure the distance between shelves for consistent spacing.
- Install anchors and supports on marked spots.
- Attach the shelves securely to the supports.
Personalizing The Space
Creating a special nursery involves adding personal touches. Shelves offer a perfect place to display these items.
Customizing wall shelves helps make the nursery feel unique and welcoming. Let’s explore some ideas.
Custom Name Plaques
Name plaques are a great way to personalize a nursery. They add a special touch and make the space feel unique.
Photo Frames And Keepsakes
Photo frames and keepsakes add warmth to the nursery. Display cherished memories on the shelves.
- Family photos
- Baby’s first shoes
- Ultrasound images
- Small soft toys
Seasonal Decorations
Seasonal decorations bring joy and change to the nursery. They can be swapped out easily to refresh the look.
| Season | Decor Idea |
| Spring | Floral garlands |
| Summer | Beach-themed items |
| Autumn | Mini pumpkins |
| Winter | Snowflakes and stars |
Budget-friendly Ideas
Creating a cozy nursery doesn’t have to be expensive. Wall shelves offer extra storage without taking up floor space. These budget-friendly ideas will help you create beautiful nursery shelves.
Using creativity and simple materials, you can make shelves that fit your style. Let’s explore some cost-saving options to beautify your baby’s room.
Repurposing Materials
Old wooden crates or pallets can become unique shelves. Sand them down and apply a fresh coat of paint. This gives them a new life and adds charm to your nursery.
Consider using leftover wood pieces from past projects. Cut them to size and mount them on the wall. This approach reduces waste and saves money.
- Wooden crates for rustic shelves
- Pallets for sturdy wall units
- Scrap wood for custom designs
Diy Tutorials And Templates
Find free tutorials online to guide your shelf-making process. Many websites offer templates for cutting and assembling shelves. These resources make DIY projects easier.
Video tutorials show step-by-step instructions. They are helpful for visual learners. You can pause and replay as needed to follow along.
- Online tutorials for easy guidance
- Printable templates for precise cuts
- Video guides for visual learning
Thrift And Discount Finds
Visit thrift stores to find inexpensive shelves. Sometimes, you can find hidden gems with a little wear and tear. A bit of paint or polish can make them look new.
Discount stores often sell shelving units at low prices. Keep an eye out for sales and clearance items. This can help you stay within budget while creating a stylish nursery.
- Thrift stores for unique finds
- Discount stores for affordable deals
- Clearance sections for budget buys

Credit: www.cbc.ca
Frequently Asked Questions
What Materials Are Best For Diy Nursery Wall Shelves?
Wood and MDF are ideal for nursery shelves. They are sturdy, safe, and easy to paint or customize. Avoid heavy or toxic materials to ensure child safety.
How To Safely Install Nursery Wall Shelves?
Use wall anchors and secure brackets into studs for stability. Keep shelves at a safe height, away from the child’s reach to prevent accidents.
What Are Creative Designs For Nursery Shelves?
Consider shapes like clouds, animals, or letters. These add charm and functionality, enhancing the nursery’s decor while storing toys or books.
How Much Does It Cost To Make Diy Nursery Shelves?
Costs vary by materials and design but typically range from $20 to $100. Simple wooden shelves are budget-friendly and customizable.
Conclusion
Creating DIY nursery wall shelves adds charm and function to any room. These shelves help organize toys, books, and decor neatly. You save money by making them yourself. Plus, you can customize shapes, colors, and sizes to fit your style.
The project is simple and fun to do with family. Small changes like these make a big difference in your nursery’s look. Try making shelves that match your baby’s theme. Enjoy a cozy, tidy space for your little one every day.