Are you ready to bring a cozy, festive touch to your home this winter? DIY winter garland projects are a simple and fun way to brighten up your space without spending a fortune.
Imagine creating beautiful, personalized decorations that make your living room feel warm and inviting. Whether you’re a beginner or love crafting, these easy garland ideas will inspire you to get creative and add your own unique style. Keep reading to discover how you can transform your home with stunning winter garlands you’ll be proud to display all season long.

Credit: www.erynwhalenonline.com
Materials For Winter Garlands
Winter garlands add warmth and charm to your home during cold months. Choosing the right materials is key to creating a beautiful garland.
Below are popular materials grouped by category to help you start your DIY winter garland project.
Natural Elements
Natural items bring a cozy and rustic feel to your garland. They also add texture and color that fits the winter theme.
- Pine branches and pinecones
- Sprigs of holly with red berries
- Dried orange slices
- Cinnamon sticks tied in bundles
- Eucalyptus leaves
Craft Supplies
Craft supplies help you build and decorate your garland securely. They also allow for creative touches and durability.
| Item | Use |
| Floral wire | Attach elements firmly |
| Hot glue gun | Secure small decorations |
| Ribbon or twine | Add color and tie pieces |
| Scissors and pruning shears | Trim materials neatly |
| Craft foam or felt | Create custom shapes |
Lighting Options
Lights bring a magical glow to your garland. Choose lighting that fits your space and style.
- Battery-powered LED string lights for easy placement
- Mini fairy lights for a delicate look
- Warm white bulbs to create cozy ambiance
- Colorful lights for a festive mood
- Solar-powered lights for outdoor use

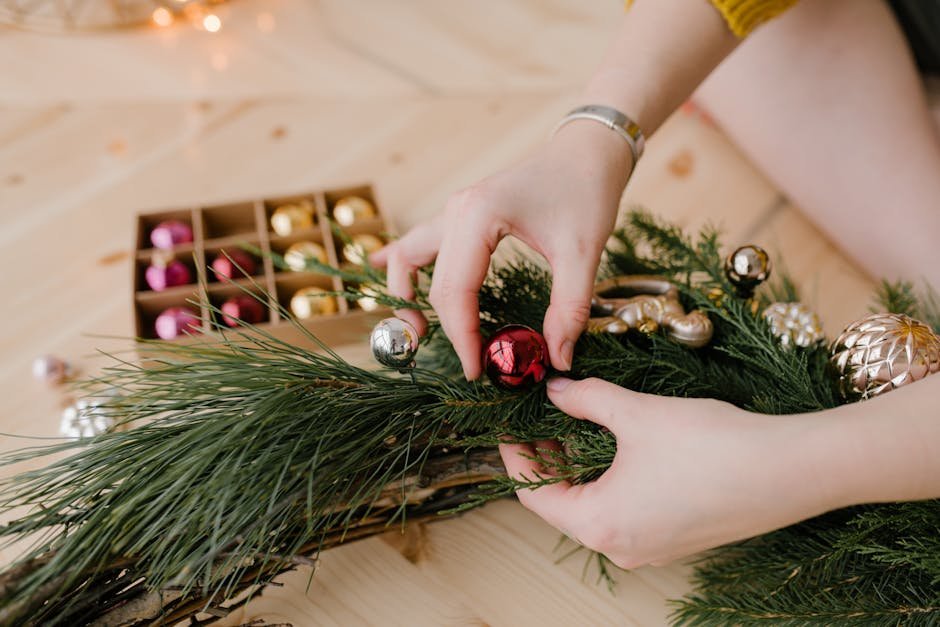
Credit: www.youtube.com
Classic Pine And Evergreen Garlands
Pine and evergreen garlands bring a timeless look to winter decor. They add natural beauty and a fresh scent to your home. Making your own garland is simple and fun.
This guide covers how to gather greens, add pinecones and berries, and secure your garland for lasting use.
Gathering Fresh Greens
Choose healthy pine branches with dark green needles. Look for evergreen clippings like fir or spruce to add variety. Cut stems that are about 12 to 18 inches long.
- Wear gloves to protect your hands
- Use sharp pruning shears
- Pick branches with firm needles
- Avoid dry or brown stems
- Collect enough to cover the length of your garland
Adding Pinecones And Berries
Pinecones and berries add texture and color. Use natural or artificial options depending on your preference. Attach them evenly for a balanced look.
| Decoration | Material | Attachment Method |
| Pinecones | Natural wood | Floral wire or hot glue |
| Red Berries | Plastic or real | Twist ties or wire |
| Silver Accents | Glittered pinecones | Glue or wire |
Securing The Garland
Use wire or twine to hold your garland together. Wrap it tightly but gently to avoid crushing the greens. Attach hooks or ribbons to hang it securely.
Follow these tips for a strong garland:
- Start by laying the greens in a line
- Wrap wire around the stems every 6 inches
- Add decorations after securing the base
- Use ribbon loops for easy hanging
Diy Felt And Fabric Garlands
Making felt and fabric garlands is a fun winter project. These garlands add warmth and style to any room.
You can use simple materials to create beautiful decorations for the holiday season.
Choosing Fabrics And Colors
Select fabrics that feel soft and hold their shape well. Felt is a popular choice because it does not fray.
Pick colors that match your home or the season. Red, green, white, and gold are classic winter colors.
- Use wool felt for a warm texture
- Choose cotton fabric for patterns
- Mix solid and patterned fabrics
- Pick colors like red, green, white, and silver
Cutting Shapes And Patterns
Draw simple shapes on paper first. Stars, trees, snowflakes, and hearts work well for winter garlands.
Use sharp scissors or a rotary cutter to cut the fabric cleanly. Cutting two layers at once saves time.
- Trace shapes on cardboard or stiff paper
- Cut fabric using the paper as a template
- Cut two pieces for each shape if you want a thicker look
- Use pinking shears to add a decorative edge
Assembly Techniques
Attach shapes using a needle and thread or fabric glue. Sewing gives a stronger hold.
String the shapes on twine, ribbon, or yarn. Space the shapes evenly for a neat look.
- Sew shapes together with running stitch or blanket stitch
- Glue small shapes onto felt backing for layers
- Use a hot glue gun for quick assembly
- Tie or glue shapes to a ribbon or string
Rustic Wood And Twig Garlands
Rustic wood and twig garlands bring a natural touch to your winter decor. They are simple to make and add warmth to any space.
Using materials from nature helps create a cozy and charming look. These garlands fit well in cabins and country-style homes.
Collecting Twigs And Branches
Look for dry twigs and small branches outside. Choose pieces that are sturdy but not too thick. Avoid wet or rotting wood to keep your garland lasting longer.
- Pick twigs with interesting shapes and textures
- Gather a mix of sizes for variety
- Use gloves to protect your hands
- Collect enough to fill your desired garland length
Painting And Decorating
Paint your twigs to add color or keep them natural for a rustic feel. You can use white paint to mimic snow or metallic colors for a festive look.
| Paint Type | Effect |
| White Acrylic | Snowy and clean look |
| Gold or Silver Spray | Festive and shiny |
| Natural Finish | Rustic and earthy |
Stringing The Pieces
Use twine or thin wire to string your twigs. Space them evenly for balance. Add beads or pinecones for extra detail.
- Cut twine to the needed length
- Attach twigs by wrapping twine around each piece
- Secure twigs tightly so they do not slide
- Add decorations between twigs if desired
- Hang your garland on a mantel or wall
Incorporating Lights
Adding lights to your winter garland makes it warm and inviting. Lights bring a cozy glow to your home during cold months.
There are many ways to add lights safely and creatively. Choose the right type and place the lights with care.
Battery-operated Options
Battery-operated lights are easy to use on garlands. They do not need a power outlet nearby.
These lights are lightweight and can be hidden inside the garland. You can move them anywhere without hassle.
- Choose lights with long battery life
- Use small battery packs for less bulk
- Turn off lights when not in use to save power
Safe Wiring Tips
Use lights made for indoor use to avoid hazards. Check wires for damage before starting your project.
Keep wires away from sharp edges and water. Secure wires tightly but gently to prevent pulling or fraying.
- Inspect all lights for broken bulbs or frayed wires
- Use electrical tape to cover exposed wires
- Do not overload power sources with too many lights
- Unplug lights when you leave home or sleep
Creative Light Placement
Place lights evenly along the garland for a balanced look. Wrap lights around branches or weave them through pinecones.
Try grouping lights in clusters to create focal points. Use different light sizes for texture and depth.
- Start from the power source and move outward
- Hide wires behind leaves or decorations
- Mix warm white and soft colors for variety
- Use small clips to hold lights in place
Personalized Garland Ideas
Creating your own winter garland adds a personal touch to holiday decor. With simple materials, you can craft garlands that reflect your style.
Personalized garlands are a wonderful way to showcase memories and creativity. Here are some ideas to get started.
Photo And Memory Themes
Use photos to create a garland that tells a story. Choose pictures from family events, vacations, or special moments.
Memory-themed garlands are unique and spark conversations during gatherings. Add small notes or captions for each photo.
- Print photos in small sizes
- Attach with mini clothespins
- Add ribbons or twine for a festive look
Name And Initial Accents
Incorporate names or initials into your garland for a personal touch. Use letters made from wood, fabric, or paper.
Names and initials make your garland special. They are great for family or personalized gifts.
- Spell out family names or greetings
- Decorate letters with paint or glitter
- Mix with other decorative elements like stars or snowflakes
Seasonal Color Schemes
Choose colors that match the winter season. Cool blues, whites, and silvers create a frosty feel.
Warm reds and greens add a traditional touch. Select colors that complement your home decor.
- Use metallic accents for sparkle
- Mix textures like felt or burlap
- Consider natural elements like pinecones or berries
Hanging And Display Tips
Creating a winter garland can add warmth to your home. Knowing where and how to hang it makes a big difference.
Consider the room’s decor and functionality. The right spot ensures your garland shines.
Choosing The Right Spot
Pick a place where your garland will be seen. Common areas include mantels, doorways, and windows.
Ensure the spot does not interfere with daily activities. Avoid high-traffic areas that might cause damage.
- Mantels provide a central display location
- Doorways can create a welcoming entrance
- Windows allow natural light to enhance the garland
Using Hooks And Adhesives
Secure your garland properly to prevent falls. Hooks and adhesives are great options.
Choose hooks that can handle the weight of your garland. Adhesive strips are useful for lighter decorations.
| Type | Best For |
| Heavy-duty hooks | Thick and heavy garlands |
| Adhesive strips | Lightweight garlands |
Maintaining Freshness
Fresh garlands can dry out quickly. Keep them looking their best with simple care.
Mist your garland with water every few days. Keep it away from direct heat sources.
- Mist regularly to retain moisture
- Avoid placing near fireplaces or heaters
- Check for dryness and refresh as needed

Credit: bowdabra.com
Frequently Asked Questions
What Materials Are Best For Diy Winter Garlands?
Natural elements like pinecones, berries, and evergreen branches work great. Fabric, felt, and paper also add texture and color. Choose materials that suit your style and are easy to handle.
How Can I Make A Winter Garland Last Longer?
Use fresh greenery and keep it cool to extend freshness. Avoid direct sunlight and mist lightly with water. For artificial garlands, store them properly to maintain shape and color.
What Tools Do I Need For Winter Garland Projects?
Basic tools include scissors, floral wire, hot glue gun, and twine. These help secure materials and create sturdy garlands. Optional tools like wire cutters and pliers make assembly easier.
Can I Customize Garlands For Different Winter Themes?
Yes, customize by adding seasonal colors, ornaments, or lights. Use rustic elements for a cozy look or metallic accents for elegance. Personalize to match your home decor and holiday vibe.
Conclusion
Crafting your own winter garland adds a warm, personal touch to any space. These projects bring creativity and joy during cold months. Simple materials turn into beautiful decorations with little effort. Try different styles to fit your home’s look. Enjoy the fun of making something unique and festive.
Celebrate the season with your handmade garland. It brightens rooms and lifts spirits. Start your DIY garland today and feel the cozy charm it brings.