Winter is the perfect time to add a personal touch to your holiday decorations. Imagine creating beautiful ornaments that reflect your style and bring warmth to your home.
With DIY winter ornament projects, you don’t need to be an expert or spend a lot of money. You can make unique pieces that tell your story and brighten your space. Ready to discover simple, fun ideas that will make your winter season truly special?
Keep reading and get inspired to start your own creative journey today!
Materials You’ll Need
Creating winter ornaments at home is fun and simple. You just need a few materials to get started. Gathering the right supplies helps make your projects look great.
This list covers basic craft supplies, natural elements, and recycled items. These materials are easy to find and work with for your DIY winter decorations.
Basic Craft Supplies
These supplies are the foundation for most winter ornament projects. You probably already have many of them at home or can buy them at any craft store.
- Glue gun and glue sticks
- Scissors or craft knife
- Colored paper or cardstock
- Markers, paints, or glitter
- String, ribbon, or twine
- Small paintbrushes
- Hole punch
Natural Elements
Using natural elements adds a warm and cozy feel to your ornaments. These items can often be found outside or in your backyard.
| Natural Element | Use Ideas |
| Pinecones | Painted or glittered for hanging |
| Twigs | Small wreath frames or stars |
| Dried orange slices | Decorative and fragrant |
| Cinnamon sticks | Tied with ribbon for scent |
| Acorns | Painted or glued in clusters |
Recycled Items
Recycled items help reduce waste and add unique touches to your ornaments. Look around your home for things you can reuse creatively.
Try these recycled materials for your projects:
- Old buttons for colorful accents
- Scraps of fabric or felt
- Used paper rolls (toilet or paper towel tubes)
- Broken jewelry pieces
- Leftover yarn or thread

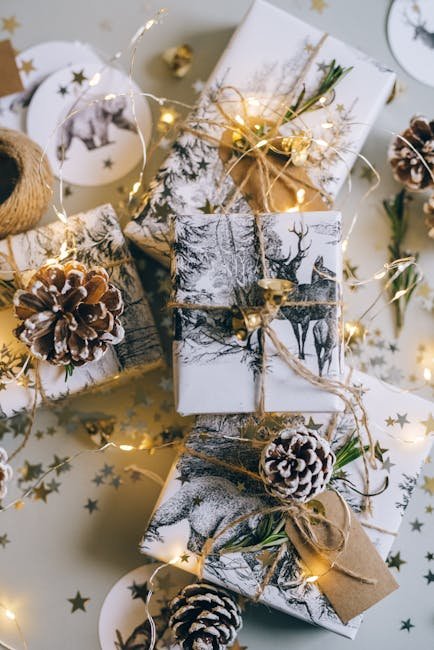
Credit: www.hgtv.com
Classic Ornaments With A Twist
Winter ornaments bring charm to holiday decorations. Classic styles can get a fresh update with simple ideas. Try adding your own touch to make them special.
This guide shows easy projects for unique ornaments. Use paint, glitter, and names to create festive decorations.
Hand-painted Baubles
Start with plain baubles and add your own designs. Use acrylic paint and fine brushes for detailed work. Simple shapes like stars, dots, or stripes look great.
- Choose matte or shiny baubles
- Use colors that match your theme
- Let each layer dry before adding more paint
- Add small details like snowflakes or holly leaves
- Seal with clear varnish to protect your art
Glitter And Glow
Glitter adds sparkle to any ornament. Use glue and loose glitter to create glowing effects. Mix glitter colors for extra shine.
| Material | Use |
| Clear glue | Adhesive for glitter |
| Loose glitter | Cover bauble surface |
| Mod Podge | Seal glitter and add shine |
| Battery tealights | Place inside transparent ornaments |
Try adding battery tealights inside clear baubles. The light shines through the glitter for a warm glow.
Personalized Name Tags
Name tags make ornaments personal gifts. Write names or short messages on small tags. Attach tags with ribbon or string.
- Wooden discs painted with chalkboard paint
- Thin metal tags engraved with names
- Paper tags with calligraphy or printed fonts
- Clay tags shaped like stars or hearts
- Ribbon with name stitched or written in fabric pen
Nature-inspired Designs
Winter ornaments made from natural materials bring a warm, cozy feeling to your home. They are easy to create and add a rustic touch to your decorations.
Using elements like pinecones, dried citrus, twigs, and berries helps you connect with nature. These projects also use simple tools and supplies.
Pinecone Decorations
Pinecones are perfect for winter crafts. They are easy to find and add a natural look to your ornaments. You can paint them, add glitter, or leave them plain.
- Gather clean, dry pinecones from outside.
- Attach a loop of twine or ribbon to the top.
- Optional: Paint the tips white for a snow effect.
- Add small beads or bells for extra charm.
- Hang on your tree or around the house.
Dried Citrus Ornaments
Dried citrus slices make colorful and fragrant ornaments. Oranges, lemons, and limes work well. They add a bright pop to your winter decor.
| Fruit | Drying Time | Tip |
| Orange | 3-4 hours | Slice thin for better drying |
| Lemon | 3-4 hours | Use fresh lemons for best color |
| Lime | 3-4 hours | Dry in a low oven or dehydrator |
After drying, use a needle to thread ribbon through the slice. Hang on your tree or tie to gifts for a natural touch.
Twig And Berry Creations
Twigs and berries create lovely, simple ornaments. You can make small wreaths or hang bundles of twigs tied with ribbon.
Materials Needed
- Small twigs or thin branches
- Red berries or berry-like decorations
- Green floral wire or twine
- Scissors or pruning shears
- Ribbon for hanging
Arrange twigs into a circle and secure with wire. Attach berries for color. Add a ribbon loop to hang on your tree or wall.
Upcycled Ornament Ideas
Upcycled ornaments turn old items into new decorations. These projects save money and help the environment.
You can make fun winter ornaments using things you already have at home. Here are some easy ideas to try.
Jar Lid Snow Globes
Use jar lids to create tiny snow globes. Add fake snow, small figures, or glitter inside the lid.
Seal the lid with clear glue or resin. Attach a ribbon to hang it on your tree.
- Find clean jar lids of any size
- Place small decorations inside
- Add fake snow or glitter
- Seal with glue or resin
- Glue a ribbon or string on top
Bottle Cap Characters
Turn bottle caps into cute characters for ornaments. Use paint, markers, or small craft items to decorate.
Add googly eyes, tiny hats, or felt pieces to make faces. Glue a loop to the back for hanging.
- Collect metal or plastic bottle caps
- Paint or color the caps
- Use craft supplies for faces
- Attach a string or hook
- Hang on the tree or use as gift tags
Fabric Scrap Baubles
Use leftover fabric scraps to cover plain baubles. Cut strips or shapes and glue them on the ornament ball.
Mix colors and patterns for a unique look. Add buttons or beads for extra decoration.
- Gather fabric scraps in different colors
- Cut into strips or shapes
- Glue pieces onto plain baubles
- Add buttons or beads if desired
- Attach hooks or ribbons for hanging
Kid-friendly Projects
Winter is a great time to make crafts with kids. DIY ornaments are fun and easy to create. These projects will keep them busy and let their creativity shine.
Here are some kid-friendly DIY winter ornament projects. They are simple and require basic materials that you may already have at home.
Salt Dough Shapes
Salt dough is perfect for creating ornaments. It’s easy to make with just flour, salt, and water. Kids can shape the dough into stars, trees, or snowmen.
Bake the dough shapes in the oven. Once cool, let kids paint them. Add a ribbon to hang them on the tree.
- Mix flour, salt, and water to form a dough
- Shape into desired forms
- Bake and paint after cooling
Paper Snowflakes
Paper snowflakes are classic winter crafts. All you need is paper and scissors. Fold the paper and cut out patterns. Unfold to reveal a snowflake.
Kids can make many different designs. Hang them in windows or on walls. They add a wintery touch to any room.
- Fold paper into a triangle
- Cut out shapes along edges
- Unfold to see the snowflake
Button And Bead Crafts
Buttons and beads can be turned into lovely ornaments. Kids can string them onto pipe cleaners or thread. Create shapes like circles, stars, or hearts.
These crafts are colorful and unique. They make great gifts for family. Kids will enjoy choosing their favorite colors and patterns.
- String buttons and beads onto pipe cleaners
- Shape into fun designs
- Use bright colors for a festive look
Light-up Ornament Concepts
Light-up ornaments add a magical touch to winter decorations. They create a warm and inviting glow. DIY projects let you customize these ornaments easily.
Using simple materials, you can create beautiful ornaments that shine in the dark. These projects work great for home or gifts.
Led Tealight Decorations
LED tealights are safe and easy to use in ornaments. They give a soft, flickering light that looks like real candles. You can place them inside clear ornaments for a glowing effect.
These lights use little power and do not get hot. This makes them perfect for kids’ crafts and indoor use.
- Use battery-powered LED tealights for safety
- Place tealights inside hollow ornaments or jars
- Decorate around the light with glitter or fake snow
- Use colored LED tealights for varied effects
Glow-in-the-dark Accents
Glow-in-the-dark paint or stickers add fun details to ornaments. They shine softly after the lights go out. Kids enjoy watching them glow at night.
Apply glow paint on clear ornaments or use glow stickers on wooden shapes. Charge them under a light before dark for the best glow.
- Use glow-in-the-dark paint on glass or plastic surfaces
- Stick glow decals on the outside of ornaments
- Charge ornaments under bright light for 10 minutes
- Combine with LED lights for extra sparkle
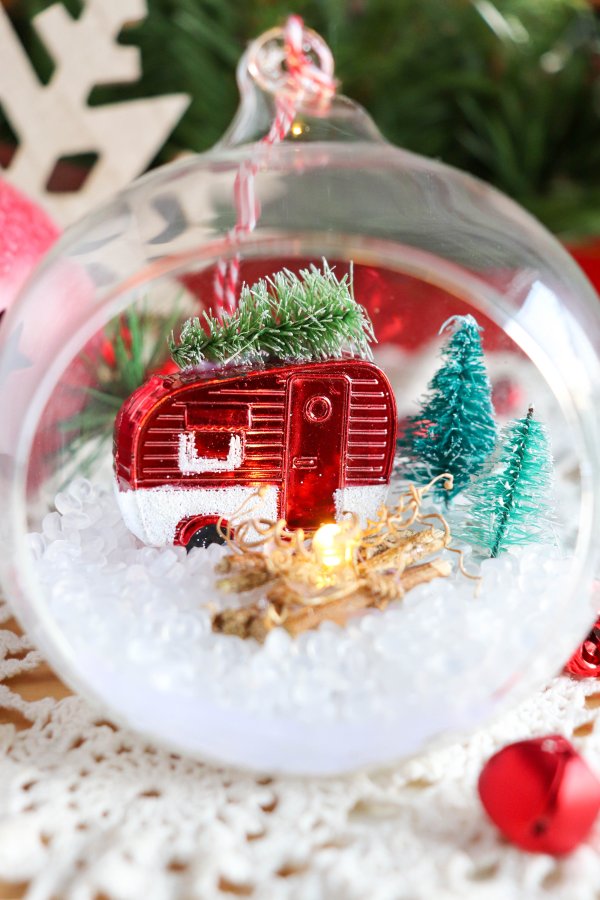
Fairy Light Jars
Fairy light jars are simple to make and look charming. Put small string lights inside a jar. The lights shine through the glass for a cozy glow.
Add decorations like ribbon, pine cones, or fake snow outside the jar. These ornaments can hang on trees or sit on shelves.
- Use battery-powered fairy lights for easy use
- Choose clear or frosted jars for different effects
- Seal the lid and decorate the jar exterior
- Place on mantels, tables, or hang with twine
Tips For Displaying Ornaments
Displaying ornaments creatively can make your winter decorations stand out. Use these tips to showcase your DIY ornaments in style.
Whether it’s on a tree, a table, or a gift, thoughtful displays add charm to your holiday decor.
Creative Hanging Ideas
Hanging ornaments isn’t just for trees. Use your imagination to find new spots for your decorations.
- Hang from curtain rods using colorful ribbons
- Attach to chandeliers for a sparkling effect
- Use suction hooks on windows for a floating look
Table Centerpiece Options
Ornaments can transform your dining table into a festive centerpiece. Here are some ideas to try out.
| Idea | Description |
| Glass Bowl Display | Fill a glass bowl with assorted ornaments |
| Candle Surround | Arrange around candles for a warm glow |
| Tiered Stand | Use a tiered stand for a layered effect |
Gift Wrapping Enhancements
Enhance your gift wrapping by incorporating ornaments. This adds a special touch to your presents.
Consider adding miniature ornaments to your gift wrap. Tie them with twine or ribbon for a personalized touch.

Credit: m.youtube.com
Credit: homemadeheather.com
Frequently Asked Questions
What Materials Are Best For Diy Winter Ornaments?
Use natural items like pinecones, twigs, and dried orange slices. Craft supplies such as felt, glitter, and ribbon also work well. These materials are affordable, easy to find, and create charming winter-themed ornaments.
How Can Beginners Start Diy Winter Ornament Projects?
Begin with simple designs like painted pinecones or paper snowflakes. Gather basic supplies and follow easy tutorials online. Starting small helps build confidence and creativity before trying complex projects.
What Tools Do I Need For Making Winter Ornaments?
Basic tools include scissors, glue, paintbrushes, and string or ribbon. Hot glue guns and craft knives help with detailed work. Having the right tools ensures neat, durable ornament creations.
Can Diy Winter Ornaments Be Personalized As Gifts?
Yes, you can add names, dates, or special messages. Use paint pens or engraved tags for customization. Personalized ornaments make thoughtful, memorable holiday gifts.
Conclusion
DIY winter ornament projects bring joy and creativity to your home. Crafting your own decorations saves money and adds a personal touch. These simple projects fit all skill levels and ages. Gather materials from around your house and start creating today.
Enjoy the fun of making something unique for your winter season. Brighten your space with handmade charm and holiday spirit. Celebrate the season with crafts that warm your heart. Try these ideas and share the joy with family and friends.